P5 - Create the content for the animation:
Creating my Backgrounds and Characters
|
|
|
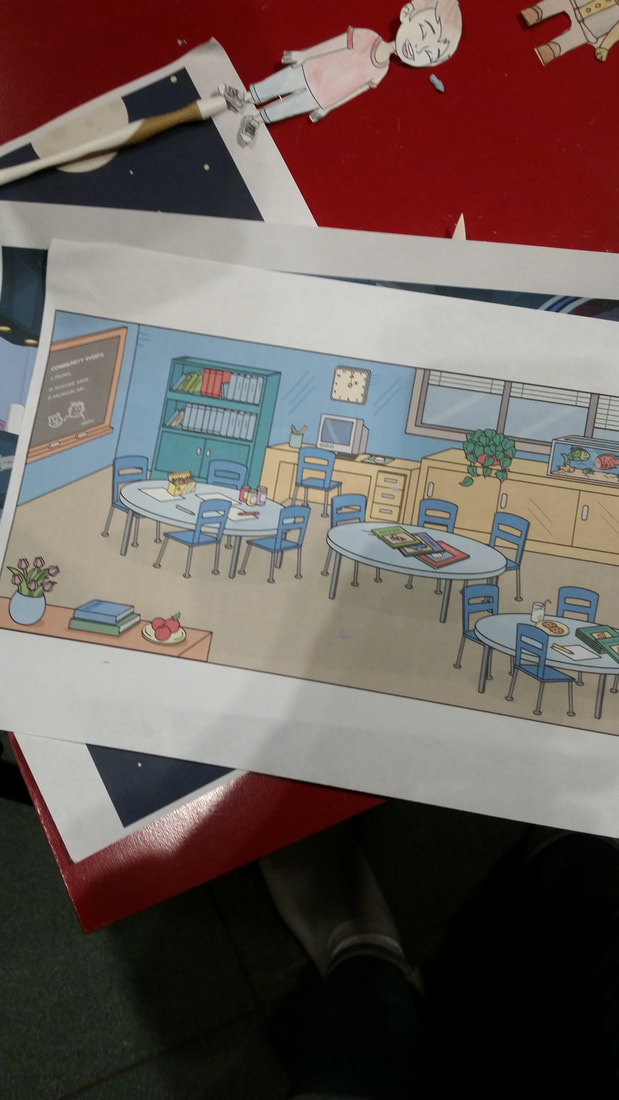
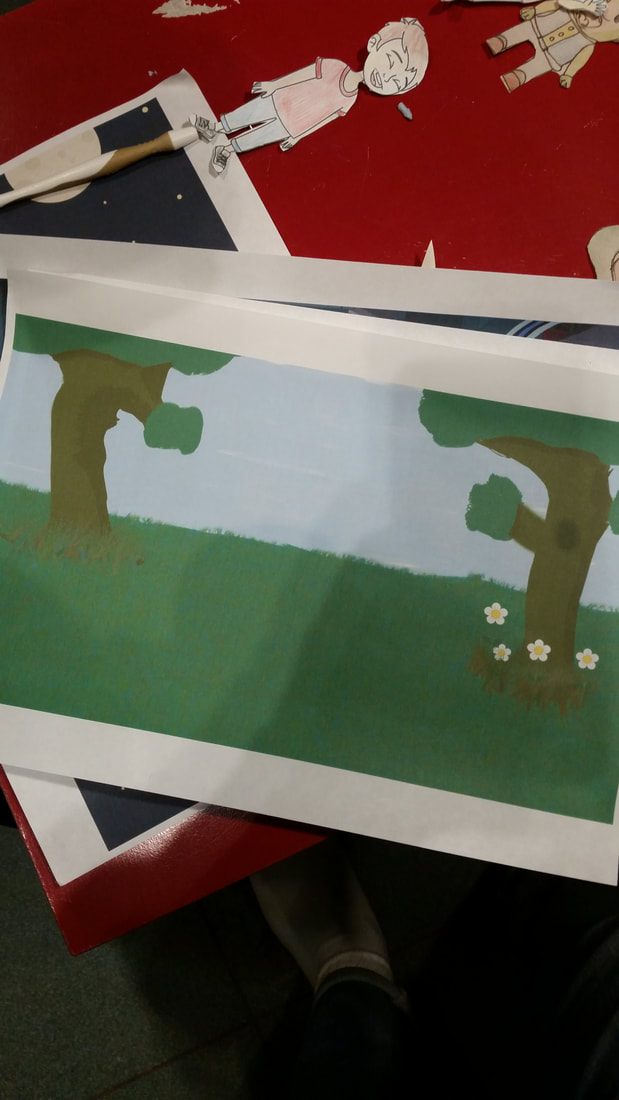
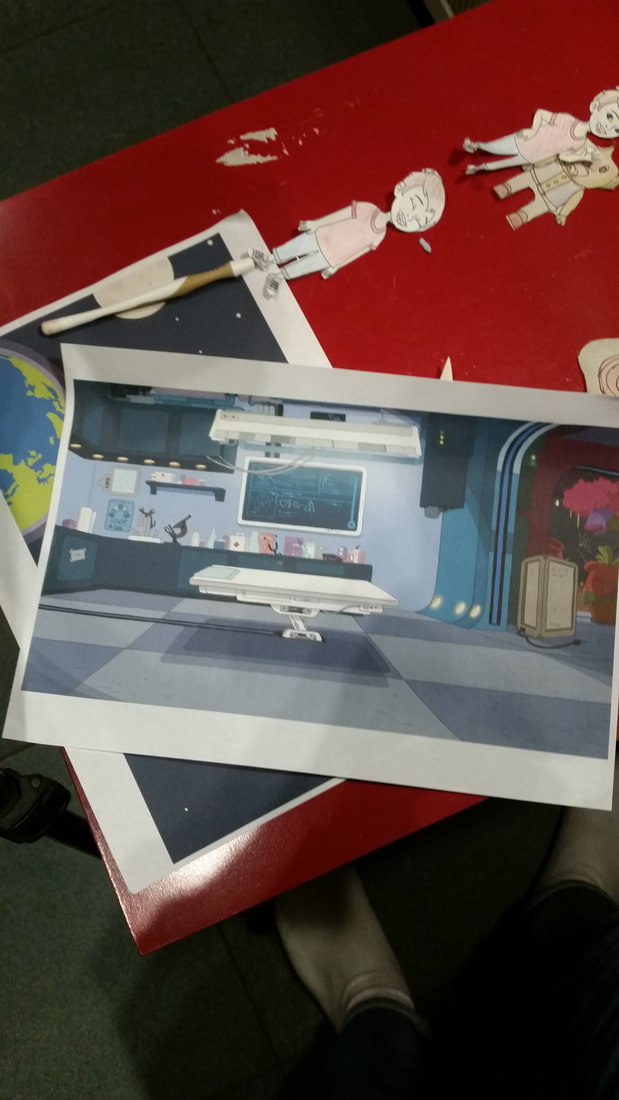
Backgrounds:
When creating my backgrounds, I started off with the concept plans and the mood boards. I created the backgrounds on photoshop, which we designed with multiple tools. I used paintbrushes and pre-exitsing images which I altered to look as I desired them to. Once the finished images were created, I had to export them in a high resolution. Once I had created on background, I then created the rest following this exact process. Once I had created all of the images, and I was 100% happy with them, I then printed them off. This was a crucial stage as I needed to ensure that the images were the correct sizes, this is so the characters and other assessts were to scale for the different scene locations. The locations which I created were; a space scene, a classroom, a forest and a interior of a rocket ship. To create these individual locations I had to:
Space: Get a background image of space off of the internet. Then open it in photoshop. I edited out all the planets and other items I didn't want in the image. Then, I panted over them to create a cartoon effect and make it the style that I want.
SpaceShip: Firstly, I dew the base of the image I wanted. Then I got some other images of spaceships which I liked, then composed them into the actual image itself. Once I had done this, I blended the original drawing with the other images to make a composed image. Then I went over the final image with a paintbrush to make the cartoon style I wanted.
Classroom: Like previously, I drew the base image to give me an idea of what the final design should look like. Then, I looked up existing classrooms from my source material, and composed a classroom from my ideas. Once I had priced together all of the features, I painted over them to create the cartoon style image which I wanted.
Forest: Creating the forest scene was vey simple, I didn't have much use for researching per-existing forests because I had a very specific idea for my forest. Firstly, I drew the outline of how I wanted my forest to look, then I coloured it all in. This gave it the cartoon appeal which I wanted for this scene and my show.
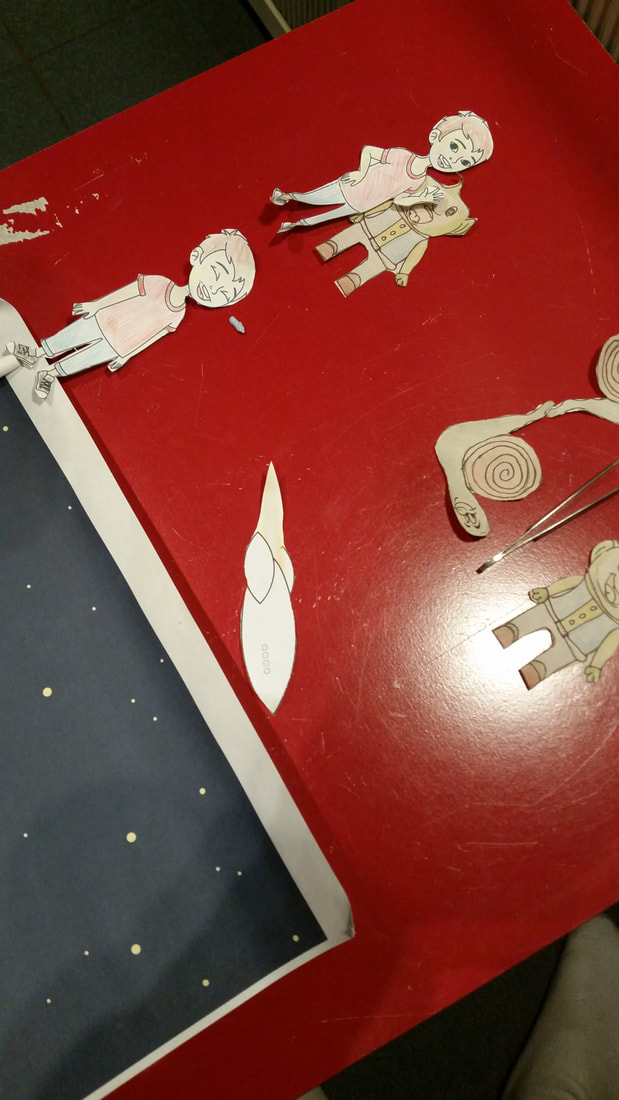
Characters:
When creating my characters, I started off with the concept plans and the mood boards. I created the outlines of the characters with pencil. Then I coloured them in with the colours I planned in my concept ideas. Then, I created all the individual facial emotions for the two main characters, which I can interchange during the animation process to convey different emotions. Once I had done this, I cut out all the assets ready for animation.
When creating my backgrounds, I started off with the concept plans and the mood boards. I created the backgrounds on photoshop, which we designed with multiple tools. I used paintbrushes and pre-exitsing images which I altered to look as I desired them to. Once the finished images were created, I had to export them in a high resolution. Once I had created on background, I then created the rest following this exact process. Once I had created all of the images, and I was 100% happy with them, I then printed them off. This was a crucial stage as I needed to ensure that the images were the correct sizes, this is so the characters and other assessts were to scale for the different scene locations. The locations which I created were; a space scene, a classroom, a forest and a interior of a rocket ship. To create these individual locations I had to:
Space: Get a background image of space off of the internet. Then open it in photoshop. I edited out all the planets and other items I didn't want in the image. Then, I panted over them to create a cartoon effect and make it the style that I want.
SpaceShip: Firstly, I dew the base of the image I wanted. Then I got some other images of spaceships which I liked, then composed them into the actual image itself. Once I had done this, I blended the original drawing with the other images to make a composed image. Then I went over the final image with a paintbrush to make the cartoon style I wanted.
Classroom: Like previously, I drew the base image to give me an idea of what the final design should look like. Then, I looked up existing classrooms from my source material, and composed a classroom from my ideas. Once I had priced together all of the features, I painted over them to create the cartoon style image which I wanted.
Forest: Creating the forest scene was vey simple, I didn't have much use for researching per-existing forests because I had a very specific idea for my forest. Firstly, I drew the outline of how I wanted my forest to look, then I coloured it all in. This gave it the cartoon appeal which I wanted for this scene and my show.
Characters:
When creating my characters, I started off with the concept plans and the mood boards. I created the outlines of the characters with pencil. Then I coloured them in with the colours I planned in my concept ideas. Then, I created all the individual facial emotions for the two main characters, which I can interchange during the animation process to convey different emotions. Once I had done this, I cut out all the assets ready for animation.
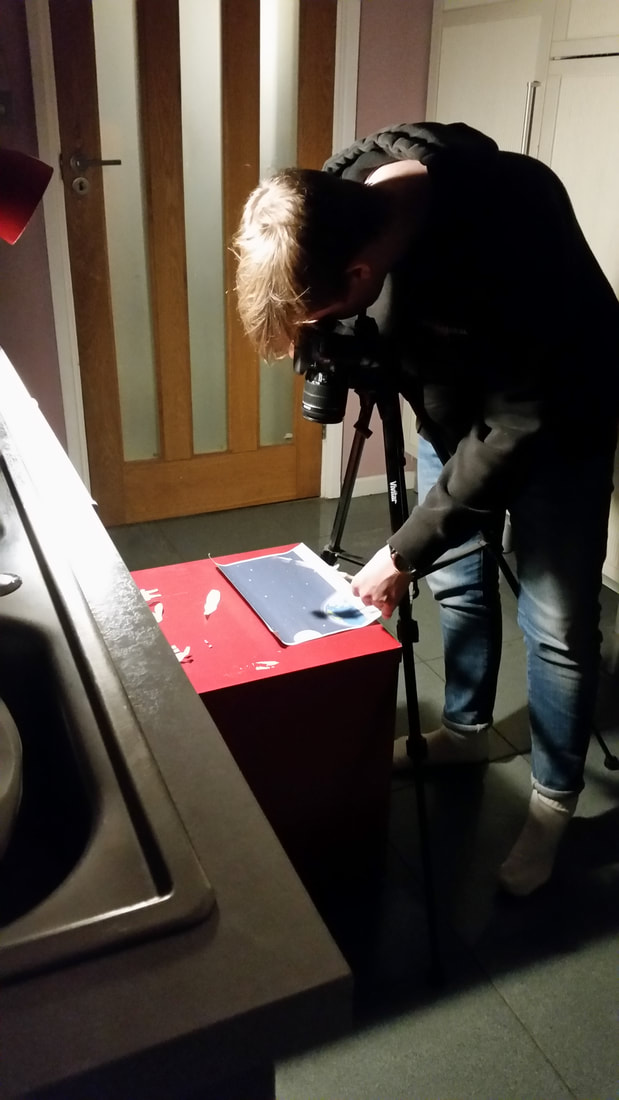
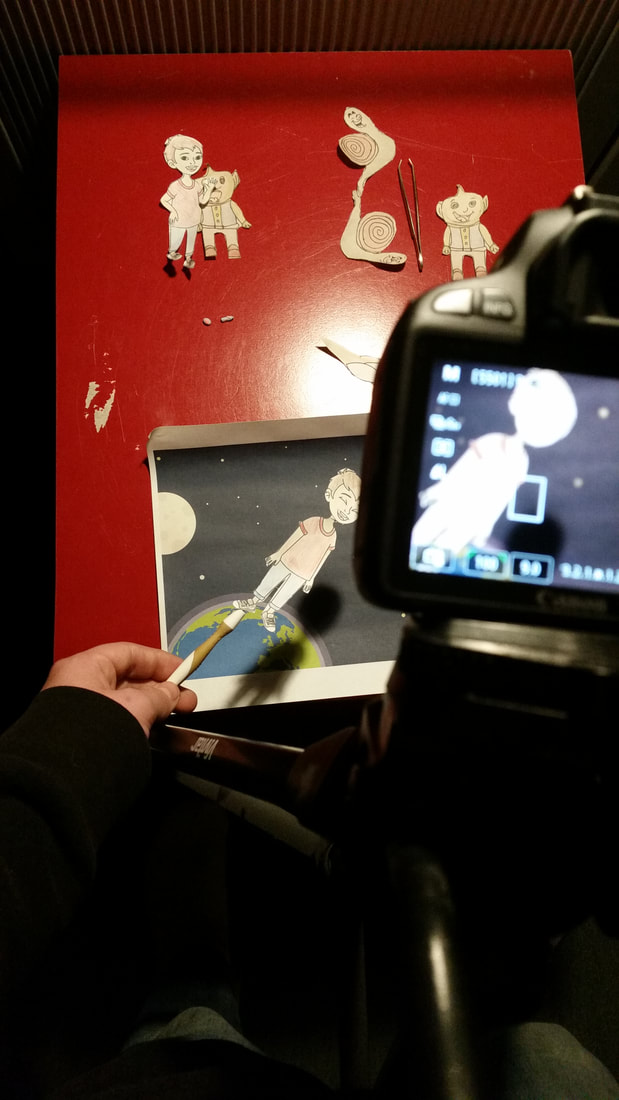
Filming the Sequence
|
|
|
The Animation process:
The animation process was rather simple when creating my sequence. Firstly, I made sure all the assets were correctly cut out and of a high quality. Then, I set up the animation area. This was built up of a desk, camera, tri-pod and lighting. This helped me to create a compelling animation. Once the animation set-up was complete, I began the animation process. Firstly, I got the desired background and the characters for the scene, then I put them in the positions they needed to be in. Then I would take a picture and then move the characters into a new position to create a motion in the animation. I would then repeat for each scene until the animation is done. Once I had done this for all of the individual scene and sequences, I then packed up the set. Then, I took the SD card out of the camera and then exported all of the footage to the editing software.
The animation process was rather simple when creating my sequence. Firstly, I made sure all the assets were correctly cut out and of a high quality. Then, I set up the animation area. This was built up of a desk, camera, tri-pod and lighting. This helped me to create a compelling animation. Once the animation set-up was complete, I began the animation process. Firstly, I got the desired background and the characters for the scene, then I put them in the positions they needed to be in. Then I would take a picture and then move the characters into a new position to create a motion in the animation. I would then repeat for each scene until the animation is done. Once I had done this for all of the individual scene and sequences, I then packed up the set. Then, I took the SD card out of the camera and then exported all of the footage to the editing software.
P6 - Complete and edit the animation content in line with the plan:
Finished edit - Sammy and Garry
Editing my Animation:
|
|
M3 - Optimise the content for use in the final animation
|
|
Frame Optimisation:
What is frame Optimisation?
Frame optimisation is when you convert and then export your final project into your desired file type. This can be done depending on what platform you exported project will be played on. For example, some file types are created for specific devices, such as cinema projections, Apple devices and special visual files (example - Flat files, large file sizes, but desired for colour correction as they produce a true colour). And then there are more generic file types such as .MOV, .MP4 which can be used on a variation of devices and can be uploaded and transfer through many web-based file displaying/sharing sites. These are usually universal available on most digital platforms.
How would this affect your project?
Frame optimisation would effect my final project because I am required to export my footage into a filetype which should be suitable for the client and for the location as to which it is being displayed on. The client brief states "The animations must be exported in a format that would be suitable for distribution across TV broadcasters and the Web". So, the Codec I exported into was H.264, which is a universally standard Codec to export film into, this means that the file will be able to be viewed on all platforms and devices. The file type I exported into was .MP4, which is a standard for Audio-Visual products, this means that the final animation can be uploaded onto most file sharing Web platforms and also it would be able to be used TV broadcaster networks as this filetype can be used to be air footage on TV.
Colour Optimisation
What is Colour Optimisation?
Colour optimisation is when the final exported product has been exported and the colours which the file will display are optimised with the consideration of file size and quality of the overall product. I ensured that the codec and file type I exported into had the best colours for broadcast without extensively effecting the file size. This means that my product will look as good as possible whilst staying at a minimal file size.
Why does colour optimisation effect my product?
Colour Optimisation would effect my animation product as I need to ensure that the colours I have used are perfect for the broadcasting of my product, this is because of the target audience. The target audience for this product is very young, so the product needs to have bright and vibrant colours which will appeal to them. Another reason that this will effect my product is that I need to be able to distribute and upload the video for the client, they will want a quick distribution, and if the project wasn't colour optimised, then the file size would be very big and it will take long to distribute.
File compression Techniques
What is file compression?
File compression is when you change the size of your file export depending on the use of compression. Compression makes the file sizes smaller, but it also effects the overall quality of your project, different file types have different compression. For example, Apple Pro Rez, is a file type which is uncompressed, which means the quality of the audio and visual product is as best as it physically can be. However, it also means that the file size is much bigger. Whereas the file type .MP4 is a compressed file. Meaning that it is a lower quality but the file size is much smaller, making it quicker and easier to distribute.
How would file compression effect your project?
File compression would effect my project as this will change the overall quality and file size of the final exported project. I will have to ensure that the file type I export into is of good quality as the project will need to be ready to broadcast on TV, but it can't be so big that it will take too long to distribute and stream. So, the file type I decided to export into was .MP4, this is because this filetype is quite good quality without the product being very large. This means that the client will easily be able to distribute the product and they can quickly upload it to web based streaming sites, and it will be at a very good quality meaning that the audience can enjoy the product without any visual issues.
D2 - Justifying the choice of animation technique for the frame-rate and duration.
Test Plan:
Unit 10 - Test Plan by Oscar JH Carter on Scribd
|
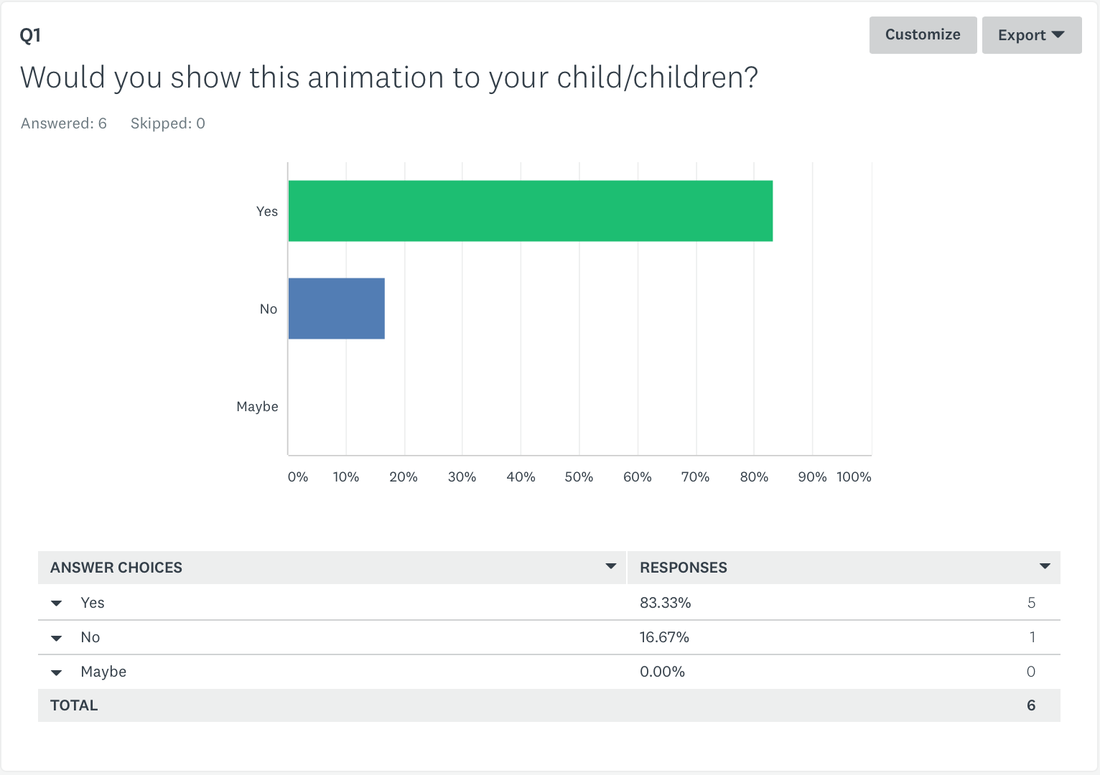
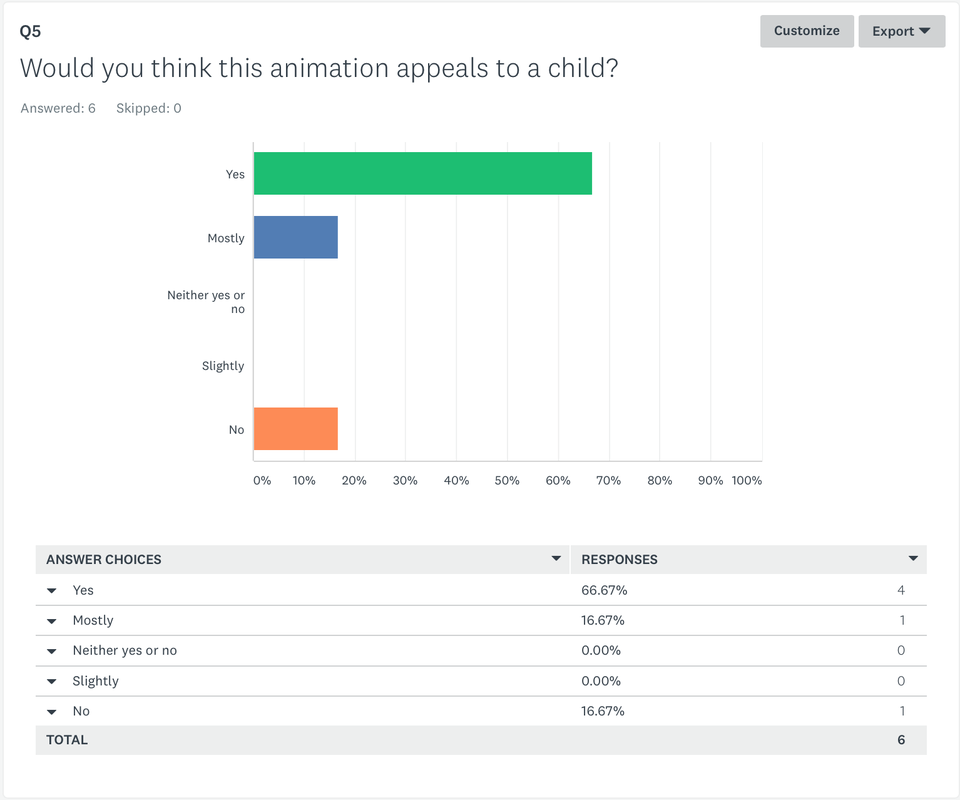
Audience Questionnaire:
https://www.surveymonkey.co.uk/r/68HYJ6Q
|
Responses from the Survey:
|
|
|
|
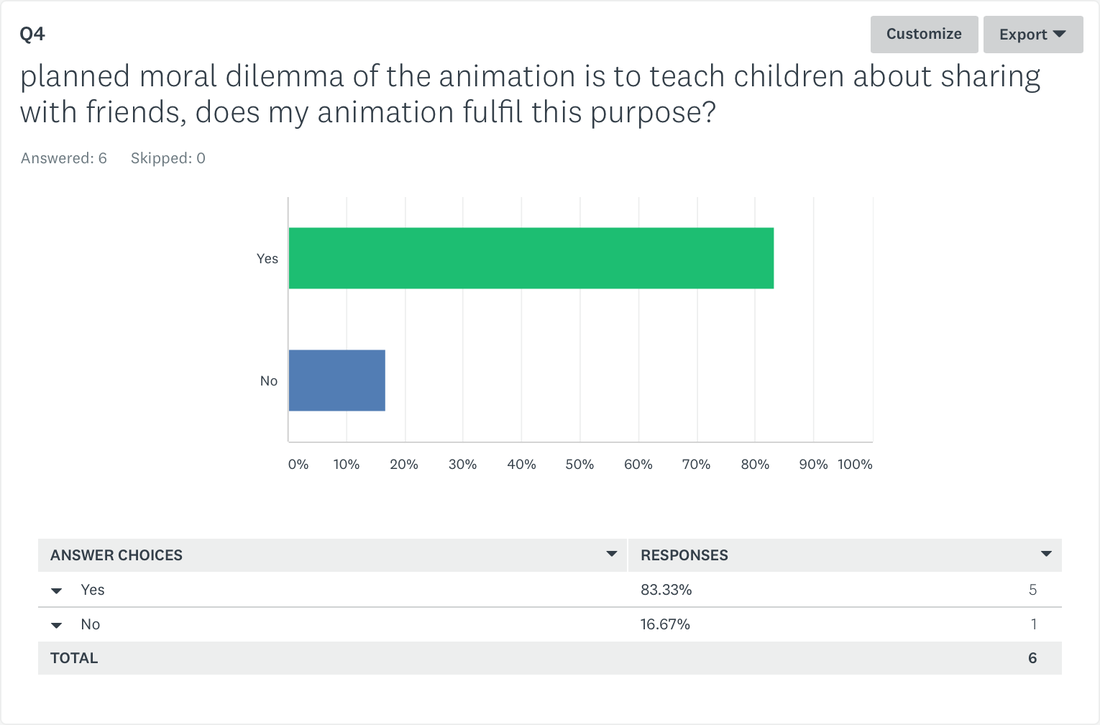
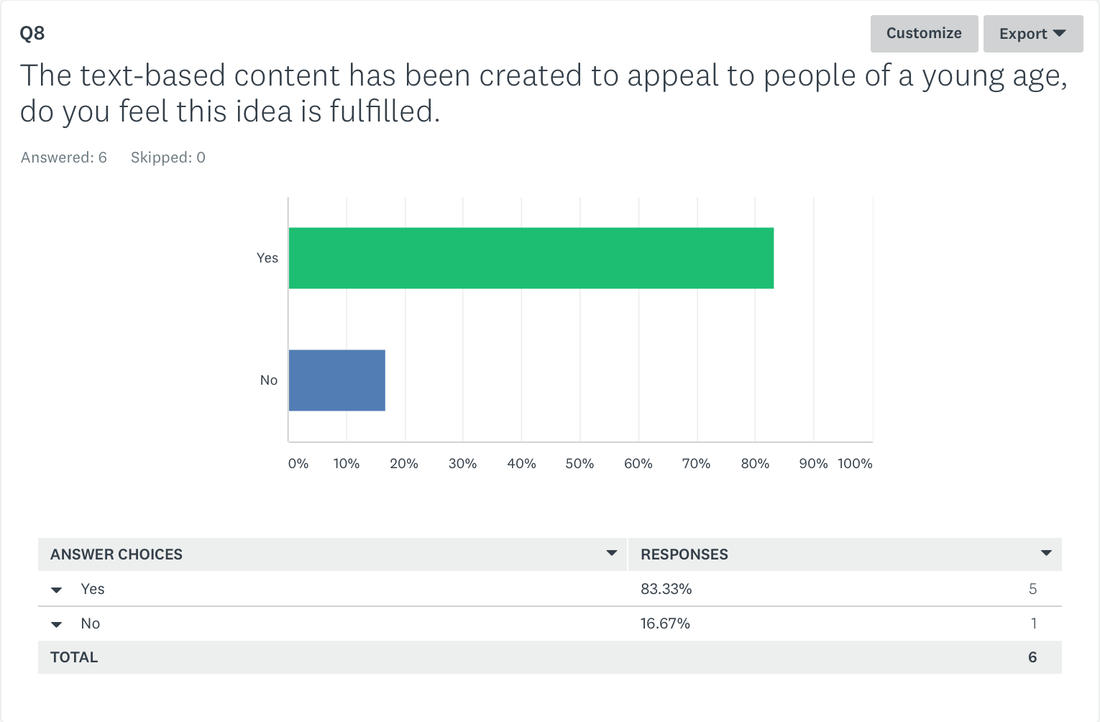
Response to audience feedback:
Does this product meet the client's brief and fit its purpose?
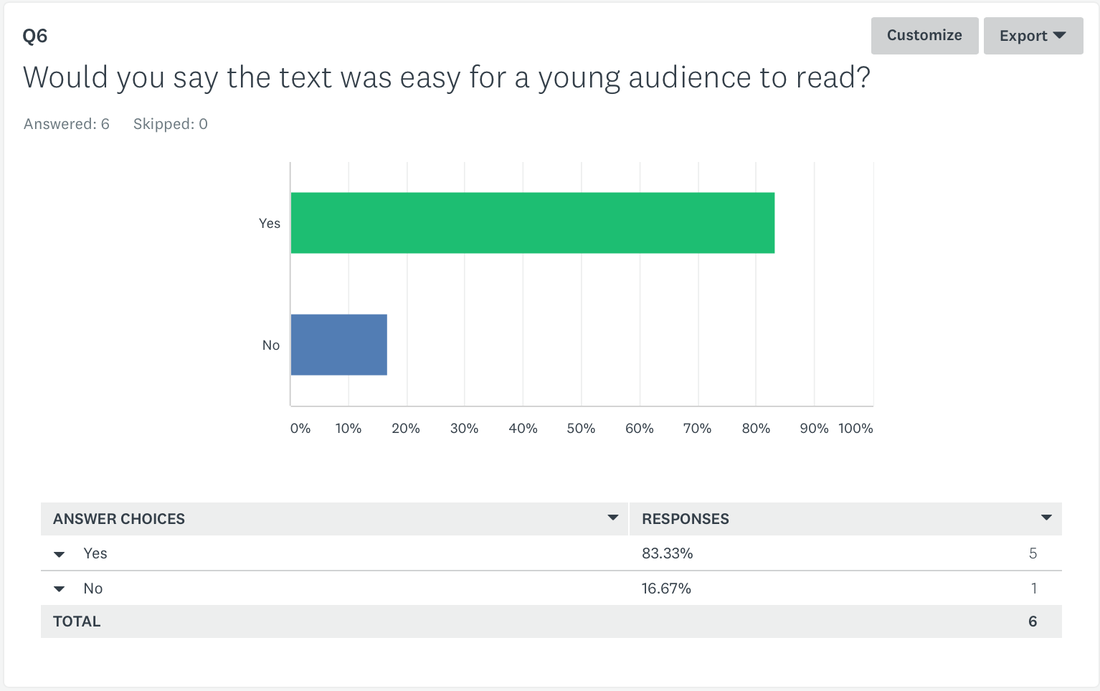
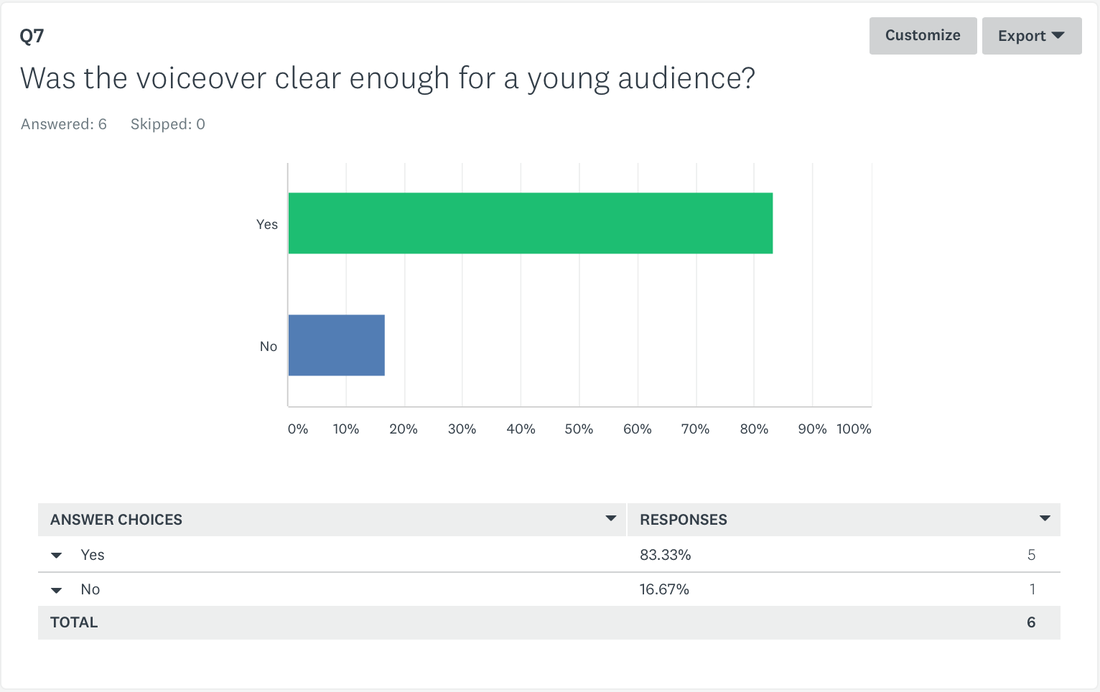
The purpose of my animation is to Entertain and Educate a young audience, as stated in the brief: "You have been asked by company TellAStory Ltd. to produce a short animation that tells a story to young people still in education. The story can be in any genre but must be creative and new and have a recognisable moral at the end". This means that I had to create a short animation which will appeal to a young audience (still in education) which tells a story. The story needs to have a moral conclusion at the end so the audience will have learnt a lesson by watching the animation. Considering audience feedback I have received about my animation, I can say that my product is fit for purpose and that it has met the client brief. 100% of the audience have stated that the planed moral dilemma and purpose of the animation has been taught in this animation. I have also ensured that I have the approval that this is fit for purpose via the target audience (still in education), this is because I asked parents to show this animation to this audience and send in their feedback. To further ensure that this product does meet the clients request to have a moral conclusion which appeals to a young audience, I researched into other successful animated sequences which have this same purpose. Then I was able to re-create my own animation knowing that my product will teach the moral conclusion as well as telling a story. To ensure that my audience enjoy the product, I used my animation research to look into storylines, character types, colours, voice overs and locations used to create an animation which will appeal to my target audience. My animation included a storyline which was easy to understand for the target audience, this is because it was simple and the story was clear. The characters used in the animation were both fantasy and realist, this is often used in animations as the characters are cute and also relatable. The characters I used in my animation were space aliens, which were short, stumpy and cute (all aspects which appeal to the target audience), and the other character was a young boy which will be relatable for the target audience.The colours used in my animation are bright and vibrant, which as research has shown, this will appeal to my target audience. The voice over was clear and understandable for my audience, the voice's we relatable to the target audience as well. This is because I was able to use a "Parent style voice" and two young voice's for the younger characters. This means that the audience will be able to relate the voice over and have a connection with the show. Finally, there were a few different locations used in my animation, there were a school, forest and a spaceship. These locations are both interesting and relatable for the target audience, this is because the spaceship will be somewhere attractive to the target audience, this place classed as fantasy which appeals to a young audience. The school and forest are place where the target audience will have typically been, so therefore these places are realistic and relatable for them. As all of these elements are both attractive and relatable to the target audience, this means that the client's brief has been followed and met as they requested that the show which appeals to an audience of this age.
The purpose of my animation is to Entertain and Educate a young audience, as stated in the brief: "You have been asked by company TellAStory Ltd. to produce a short animation that tells a story to young people still in education. The story can be in any genre but must be creative and new and have a recognisable moral at the end". This means that I had to create a short animation which will appeal to a young audience (still in education) which tells a story. The story needs to have a moral conclusion at the end so the audience will have learnt a lesson by watching the animation. Considering audience feedback I have received about my animation, I can say that my product is fit for purpose and that it has met the client brief. 100% of the audience have stated that the planed moral dilemma and purpose of the animation has been taught in this animation. I have also ensured that I have the approval that this is fit for purpose via the target audience (still in education), this is because I asked parents to show this animation to this audience and send in their feedback. To further ensure that this product does meet the clients request to have a moral conclusion which appeals to a young audience, I researched into other successful animated sequences which have this same purpose. Then I was able to re-create my own animation knowing that my product will teach the moral conclusion as well as telling a story. To ensure that my audience enjoy the product, I used my animation research to look into storylines, character types, colours, voice overs and locations used to create an animation which will appeal to my target audience. My animation included a storyline which was easy to understand for the target audience, this is because it was simple and the story was clear. The characters used in the animation were both fantasy and realist, this is often used in animations as the characters are cute and also relatable. The characters I used in my animation were space aliens, which were short, stumpy and cute (all aspects which appeal to the target audience), and the other character was a young boy which will be relatable for the target audience.The colours used in my animation are bright and vibrant, which as research has shown, this will appeal to my target audience. The voice over was clear and understandable for my audience, the voice's we relatable to the target audience as well. This is because I was able to use a "Parent style voice" and two young voice's for the younger characters. This means that the audience will be able to relate the voice over and have a connection with the show. Finally, there were a few different locations used in my animation, there were a school, forest and a spaceship. These locations are both interesting and relatable for the target audience, this is because the spaceship will be somewhere attractive to the target audience, this place classed as fantasy which appeals to a young audience. The school and forest are place where the target audience will have typically been, so therefore these places are realistic and relatable for them. As all of these elements are both attractive and relatable to the target audience, this means that the client's brief has been followed and met as they requested that the show which appeals to an audience of this age.
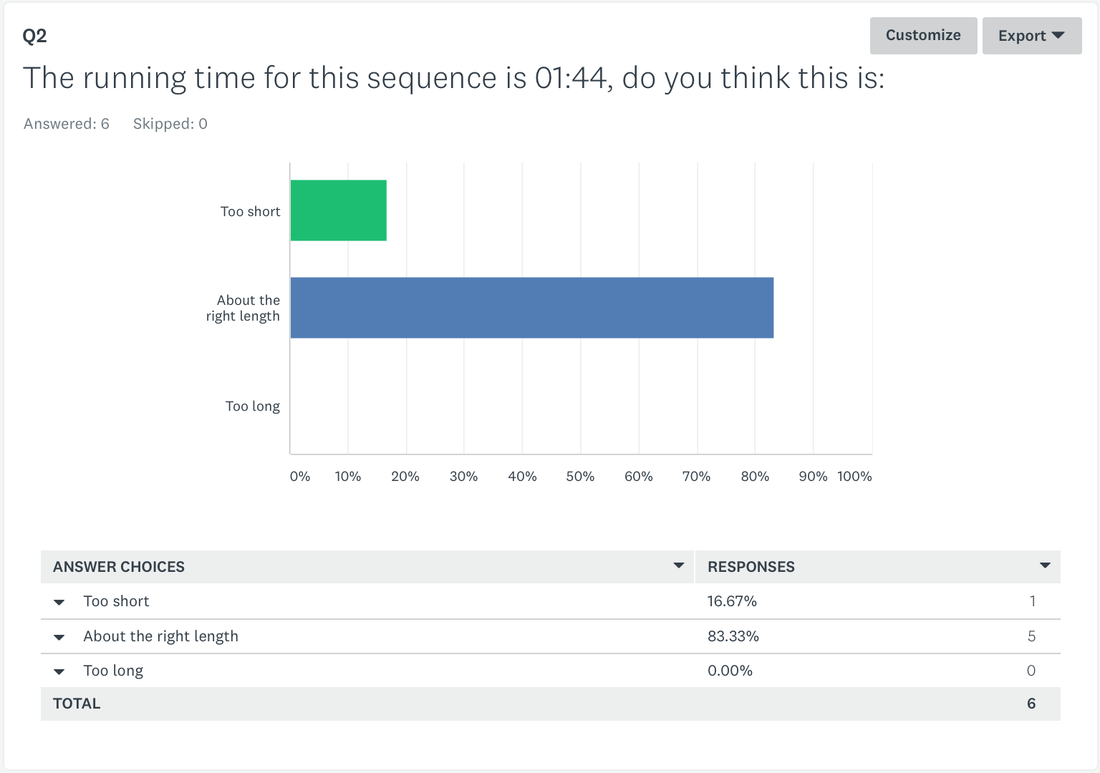
Justify the length of your animation:
Considering the length of my animation was 01:44, I feel that this could defiantly be longer. I feel that in the real world, an animation will need to be longer than this, as there aren't many animatied products which appeal to the same target adueicne as this which are around the same length. To ensure that I created an animation which appeals to the target audeicne, the product defniatly needs to be longer. A longer product will allow the audiecne to gain a further understanding and connection with the characters, locations and story line.
|
Junkyard Jim is a short animation which is aimed at the same target audience. The length of these aniamtion ususaly last around 2 minuets and are played inbetween main shows on Cbeebies. This is the closest animation in length to my animation. I feel that this animation successfully teaches a lesson in the time provided by the animation. I also believe that my animation successfully teaches the lesson but I feel that my animation would be much clearer and the lesson would be easier to understand if the animation was longer. Also, as the target audience is of a much younger age, it may take them longer to understand topics which are easy for people of an older age, so to ensure that the audience fully understand the story and moral dilemma covered in this animation. Most animations created for children run for around 10 minuets long, which means that audiences is easily entertained by the show and it give them a long enough time to develop their own ideas on the show, characters, story, location and moral lesson.
|
|
What could have been done differently in the planning, production and editing?
I feel there are a few different things I could have done to overall improve on my animation. After researching into the client's and target audience's needs I now have a much clear idea on what should have been done to create a overall more professional animated sequence. These are the things I feel could have been done differently when creating my animation:
Pre-Production:
During my Pre-Production for my animation, I feel I should have further researched into existing similar products, which would have given me a clearer idea of my target audience, and what I need to include in my show, this goes for content and storyline. This means that I would have been able to know what type of stories appeal to this audience, as well as locations, colours and characters. This way I could have created Pre-Production material which will be defiantly suitable and targeted towards my audience. Another way to get this information would be to create a focus group of young children and ask them what they want from an animated show, which will then help me to create a show which defiantly appeals to my target audience.
Another thing I feel which should have been done during the Pre-Production phase, is to have researched into what types of animations appeal to my target audience, this is because all though Stop Frame is a key animation genre, I feel it isn't as popular as animation types such as 3D CGI animations. If I had done this, I would have been able to create an animation which is a genre which appeals to my target audience.
Production:
During my Production phase, I feel that my animation didn't end up looking as professional as possible. I think if I was to create another animation, I would have to create a few different test animation to see how I should create the final animation. This way I will be able to know what resources and equipment I needed to use when creating the animation. I think that this will improve the overall quality and professionalism of an animation as the production technique will be much improved, and the skills needed would have been practiced and mastered.
Another thing I would have changed in the production process would be to work with a team, as I feel this would greatly improve the overall quality and the time taken to create the animation. This means I will be able to create more higher quality content and allow my audience to have a more enjoyable experience when watching the animation.
Post-Production:
As for Post-Production, I feel there are a few different things I would do if I went through this process again for another animation. Firstly, I would ensure that the animation was smoother, a way to have done this would be to increase the fps of the edit, meaning the movements will be more fluid and the animation will look more professional. Another thing I would do in Post-Production would be add special effects to the sequence, this would mean that the animation would look more realistic and it would be more enjoyable for the audience to watch. Another thing I could do differently would be to add more sound effects to the sequence, this would mean that the sequence would be more realistic and become more enjoyable to watch. The last thing which I would do differently would be to change the colouring of the footage, this way I can ensure that the visuals stay the same throughout the sequence and that the overall footage looks more professional.
If I had to create another animation with a different brief, what would I do differently?
I think that there are a few things I would do differently if I was to create another animation to a different brief, these will increase the professionalism of my animation. Considering that I had very little experience with creating animations, I think doing it again will allow me to know what needs to be done for each process (Pre-Production, Production and Post-Production), as I have experienced these processes. So, the things I would change if I was to create another animation would be:
- Firstly, I would create the animation in a different style, all though this could be a harder/longer process as I will have no experience in these methods, a different animation such as 3D will look much more professional and more visually appealing. Also, a 3D animation will allow me more freedom with creating Characters, locations and movements, as everything can be changed after it has been created. This will give me more freedom when creating the animation, and I will be able to change things during the process when I feel they need changing. Capturing 3D animations are significantly easier in comparison to Stop Motion, as the recording of the sequence is all done in software, meaning that I am able to place the camera where-ever I want and I am also able to place them in locations which would be expensive/impossible to capture when creating the same sequence in a different form of animations.
- If I was to create another animation, I would defiantly create one with a team, this is because I found creating the animation was a lengthy process and it was difficult to do all the tasks at once (movement and capturing). I feel if I was in a team I would be able to ensure continuity whilst the animation is being processed. This means that I will need a small team which would be built up of Camera Operator, animator (moving the characters, sets and all assets), a Director (to ensure that everything goes smoothly and the animation maintains continuity) and an editor. All of these team members will allow me to create the animation faster and of a much higher quality, meaning the animation will look more professional and aesthetically pleasing.
- Another thing I would change would be to get a professional voiceover and voices specific to characters, these need to be relatable and interesting for the audience. This would improve the overall quality of my animation, and create a more professional product and allow my audience to enjoy and interact with the product.
- Equipment was a key limitation when creating my animation, this is because I had a limited camera which meant that the quality of the animation was much lower than I had anticipated. When creating another animation, I would ensure that the equipment is of a much higher quality, which will mean that the overall quality of the animation will be improved and then my audience will be able to enjoy the product much more. This will allow me to show this animation to a wider audience and the quality will be more attractive and the visuals will be more aesthetically appealing to my audience.
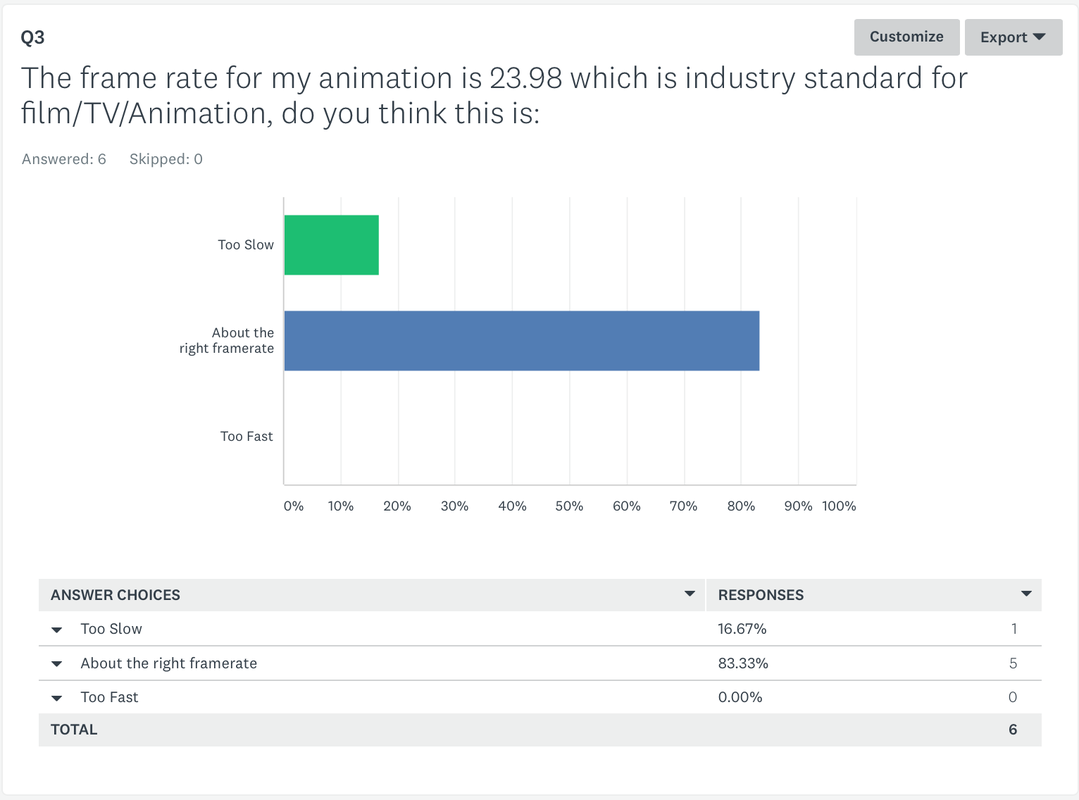
Justify the Frame-rate used for the medium:
For my Animation, I decided to export it at 23.98 FPS, this is because I believe this frame rate will create a smooth and professional animation. I did some trial and error with the frame rates, I used lower frame rates such as 16 fps, and this was just too slow for stop motion animation, it made the footage really choppy and stiff, and it wouldn't be professional to export it at this frame rate. I also tried 60fps, which was too fast for my animation, this made my animation really quick, though it was more fluid, if I wished to export in this frame rate, I would have had to shot more images and moved the characters, locations and other props less distance thus creating a more fluid animation. However, this would have taking too much time for my animation type and it would be difficult to edit the animation to this fps in the timescale provided.
Also, size would be effected by exporting this animation in different frame rates. For example, if I exported this animation at 60fps, the size of the files would have been much bigger, and could take up more storage when exporting and transporting the final file. Also, it would take longer to upload the content to sharing platforms such as YouTube. And it would take longer for the audience to stream it if they decided to watch the video via the internet. With the fps I decided to export to (23.98), the final animation file will be quick to upload and download, and it will also be quick for users to transport the files from computer to computer. The exporting process was also quicker as the file size is smaller.
Also, size would be effected by exporting this animation in different frame rates. For example, if I exported this animation at 60fps, the size of the files would have been much bigger, and could take up more storage when exporting and transporting the final file. Also, it would take longer to upload the content to sharing platforms such as YouTube. And it would take longer for the audience to stream it if they decided to watch the video via the internet. With the fps I decided to export to (23.98), the final animation file will be quick to upload and download, and it will also be quick for users to transport the files from computer to computer. The exporting process was also quicker as the file size is smaller.
